Publication date: 13-02-2026 | Update date: 13-02-2026 | Author: Piotr Kurpiewski

-
Online courses
- All
 3ds Max
 AI - Artificial Intelligence
 Blender
 Corona renderer
 GstarCAD
 LayOut
 Photoshop
 Interior Design
 Revit
Revit Sketchup
 Stable Diffusion
 V-ray
V-ray
"Online courses" are comprehensive online training programs that will help you quickly master the software you are interested in.
- Plugins
- 3D Models
- Help
- Articles
SketchUp - Overexposed windows, what to do? - Guide, tutorial
To solve the problem of overexposed windows in your V-Ray visualizations, adjust the Exposure Value parameter appropriately. You can find it in Asset Editor > Camera > Exposure Value. You can use automatic exposure - the software will determine the value at which the visualization looks best. You can also add stronger lighting to the scene. Another method is post-production in Photoshop or using an HDRI map. In the rest of this article, you will learn how to do it step by step.
Index
You have probably noticed that during interior renderings the exterior is heavily overexposed. This is due to the exposure difference between them and is a natural phenomenon. However, if you want to eliminate it, this article will be helpful for you.
Exposure
The problem of overexposed windows is common in photography. When taking a photo with a camera (or even a smartphone), you set how much light should reach the photosensitive sensor. This is the so-called exposure value. Along with it, the brightness of the image changes. You need to choose an exposure that makes the photo bright but not overexposed, with clear shadows but not too dark.
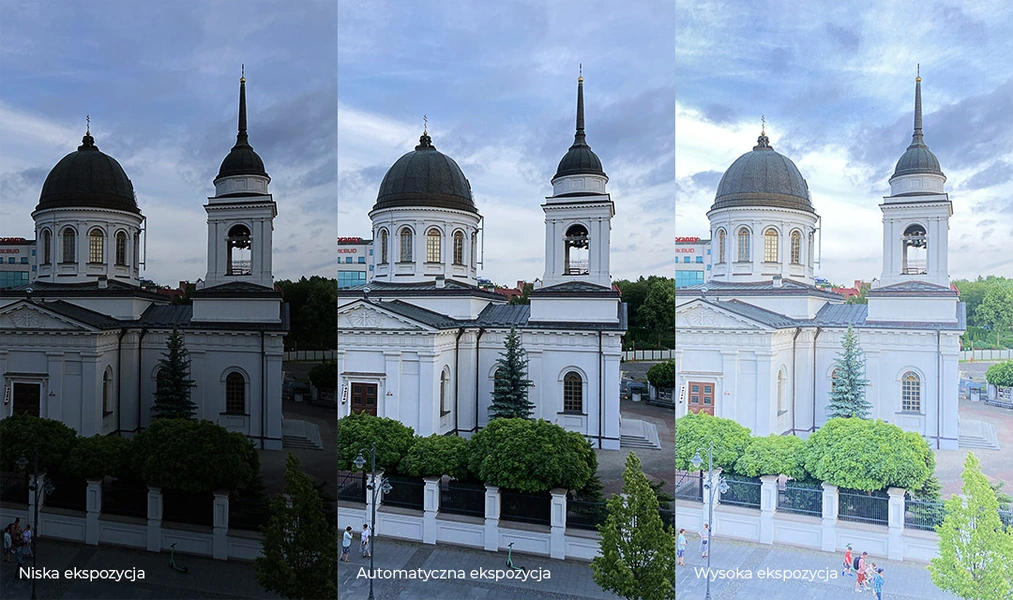
On a daily basis, it’s hard to tackle this problem because smartphone camera apps choose the exposure value automatically. Only after switching to manual mode can you set it yourself. See the comparison of the photos taken with an iPhone below to understand what it’s all about.
Exposure Value
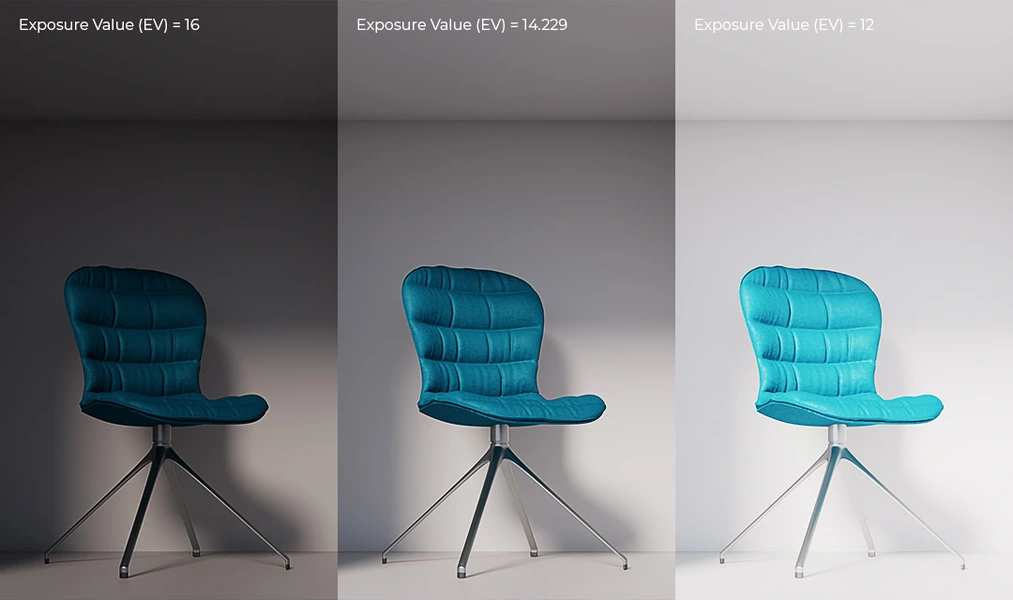
When creating a visualization in V-Ray, you proceed in the same way, even if you’re not fully aware of it. In the rendering settings, in the Asset Editor, under the Camera tab, there is the Exposure Value parameter. By default it is 14.229, but you can change it freely. The lower it is, the more light reaches the virtual sensor, and the image becomes brighter.
If you don’t want to look for the right value yourself, you can enable automatic exposure, which works exactly like smartphone software. It automatically finds the settings in which the visualization looks best.
In the world of 3D graphics, besides exposure, you can also control lighting. You can easily change the Sun’s intensity or even turn it off completely. To brighten the interior, you simply add stronger light to the scene. With these unlimited possibilities in V-Ray, one can forget about exposure, which in photography is the primary tool used to control brightness.
CHECK OUT ONLINE SKETCHUP COURSES FOR BEGINNERS
The Exposure Difference Problem
When creating visualizations, no matter how hard you try, you won’t be able to set the exposure so that both the interior and the exterior are evenly lit. To see this, refer back to the photos in the first paragraph. This is due to the natural difference between the amount of light outside and the amount of light reaching the interior. Whenever the interior is evenly bright, the exterior will be heavily overexposed. This will be especially noticeable outside the window. What can be done about it?
Combining Images with Different EV
The first solution is to prepare two images: one with a higher EV for the exterior and one with a lower EV for the interior, and then combine them in external software, such as Photoshop. This is a common practice in photography.
You just need to create a mask for the windows and then overlay one layer on top of the other. If you do it subtly, the effect won’t be so obvious. Look at the example below. The bottom layer is the image with the higher EV, meaning the windows are overexposed. The top layer has a lower EV, and its opacity is limited to the small, selected area of the windows.
Using an HDRI Map
If you don’t care about a specific exterior or if you don’t have modeled surroundings at all, you can use a background that won’t be sensitive to exposure changes or lighting settings. You just need to apply an HDRI map with special properties.
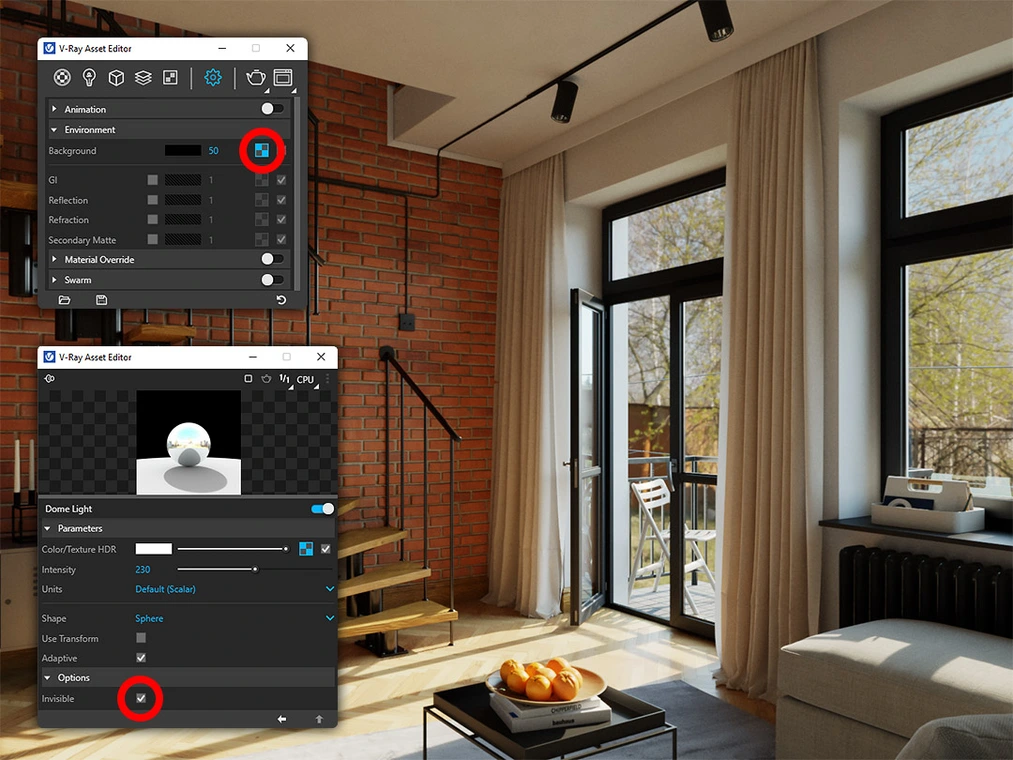
First, you need to choose an appropriate image, e.g. from Polyhaven. It’s a platform with free HDRI maps, i.e. 360° views with a wide brightness range. Select one that best fits your project. Add the downloaded map as a Dome Light source and enable Invisible in the additional options. Then, in Background under the Environment tab, add the same (or a different) map to override the existing background. This will allow you to freely adjust the view outside the window.
You can control the map’s brightness without changing the overall composition’s brightness. Just change the value 1 next to Background to, for example, 50. You can freely rotate the view by going into the Bitmap, expanding the Texture Placement menu, and changing the H parameter, which controls horizontal rotation.
Conclusion
I hope that these two methods I’ve presented will help you solve the problem of overexposed windows and that this article will contribute to your understanding of the complex nature of exposure.
If you’re looking for more tips related to SketchUp and V-Ray, check out our basic and advanced course offerings. You’ll find materials dedicated to interiors, exteriors, and product visualizations.
Author

Przeczytaj o programie Sketchup na naszym blogu
-
![Unusual Shapes and Tiles in SketchUp – Gores, Hexagons, and Fans]()
Unusual Shapes and Tiles in SketchUp – Gores, Hexagons, and Fans
Hexagons and gores in SketchUp in 5 seconds? Discover how to model the most challenging tile shapes. Read now! -
![3 ways to create a floor in SketchUp – from texture to a 3D model]()
3 ways to create a floor in SketchUp – from texture to a 3D model
From a flat texture to advanced 3D. Discover 3 methods for creating a floor in SketchUp and uncover our reliable "gamechanger". Read on! -
![French and Classic Herringbone in SketchUp – how to do it quickly and error-free?]()
French and Classic Herringbone in SketchUp – how to do it quickly and error-free?
Manual herringbone installation is a nightmare! See how to automate this process in SketchUp and save hours of work. Click to find out! -
![Floor Generator for SketchUp not working? Discover the best alternative in 2026!]()
Floor Generator for SketchUp not working? Discover the best alternative in 2026!
Tired of Floor Generator errors? Discover the reliable Custom Ground Wizard plugin and create 3D floors stress-free. Read the article!
Want to learn Sketchup? Check out our free online course!